
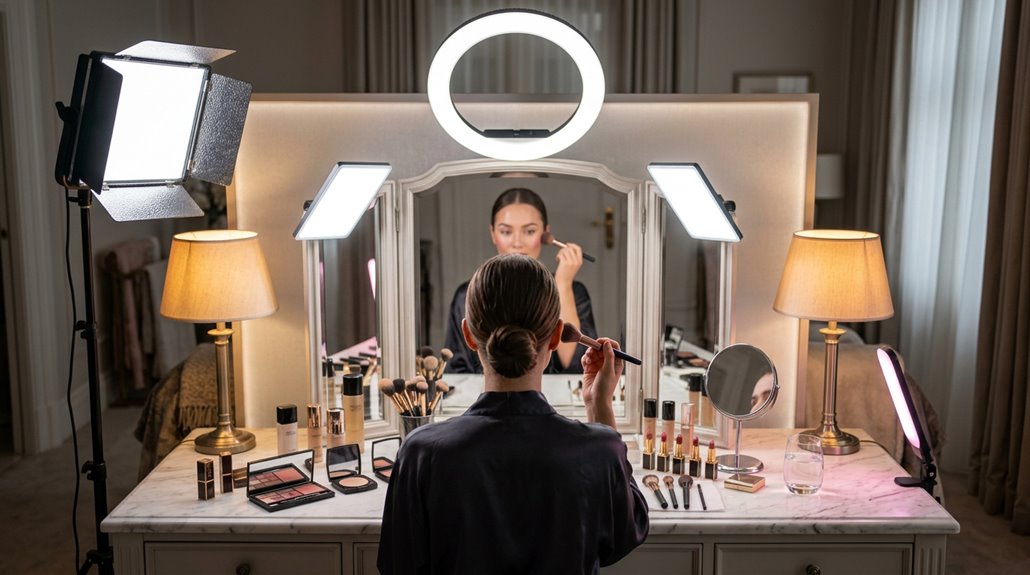
I learned the hard way that bad bulbs ruin good makeup. You’ll want 4000K–5500K LEDs with 90+ CRI for true colors, plus lights at face height to kill under-eye shadows. I layer three sources: overhead plus two side lights at 45 degrees, and add a front-facing ring light for even blending. Dimmers help you adjust from morning to night without washing out your foundation. Match your setup to where you actually go. Proper lighting directly improves makeup application accuracy and blending results.
Choose 4000K–5500K Bulbs for Accurate Makeup Color

Few things are more frustrating than leaving your bathroom mirror, thinking your makeup looks flawless, only to catch your reflection in natural daylight and wonder what happened to your foundation. This is a common problem worth fixing.
There’s nothing worse than flawless bathroom mirror makeup that falls apart in natural daylight.
The easiest way to avoid this disaster is choosing the right color temperature. My recommendation:
- Look for bulbs between 4000K–5500K
- 4000K gives a warm, natural glow
- 5000K mimics true daylight perfectly
- 5500K delivers bright, clear illumination
This range eliminates the yellow cast from 3000K bulbs and the harsh blue tint from 6000K+ options. Your foundation will match your neck, your blush won’t look clownish, and you’ll feel confident walking into any light.
Pair this color temperature with high CRI (90+) bulbs for professional results at home.
Select High-CRI LEDs to Eliminate Color Distortion

Color temperature gets you close, but CRI is what determines the final result. I have picked the perfect 5000K bulb, only to discover my foundation looked orange in daylight. That’s because CRI (Color Rendering Index) matters just as much as temperature.
Here’s how CRI works:
- CRI measures how accurately light shows true colors
- Anything below 90 distorts makeup shades
- LEDs typically score 90–98, beating fluorescents every time
High-CRI LEDs reveal undertones, blush, and shadows exactly as daylight sees them. Your shade matching stays consistent whether you’re at brunch or under office lights. Avoid low-CRI bulbs, like those cheap spiral fluorescents, to eliminate the guesswork that ruins otherwise perfect application.
Position Lights at Face Height to Banish Under-Eye Shadows

I have unfortunately done this several times: set up a mirror under a ceiling light, only to find raccoon eyes staring back at me. The easiest way to banish those under-eye shadows is positioning your lights at face height, roughly eye level on both sides of your mirror. When light hits you straight on instead of from above, you’ll get even, flattering coverage that makes blending foundation and concealer far easier.
Shadow Elimination Basics
When I first started doing my makeup in a bathroom with only overhead lighting, I couldn’t figure out why I looked fine in the mirror but tired everywhere else. Those ceiling lights were casting deep shadows under my eyes that no concealer could fix. I’ve done this several times, and this is worth fixing.
Here’s how to eliminate those stubborn shadows:
| Light Source | Best Placement | Key Setting |
|---|---|---|
| Ring light | Slightly in front, 1–2 feet | 4000–5500K color temperature |
| Vanity strips | Both sides of mirror, face height | 90+ CRI for true color |
| Adjustable lamp | Cross-angled, not directly side | Dimmable brightness |
| Ceiling fixture | Never use alone | Add side fill lights |
| Natural window | Front-facing, diffused | Supplement with artificial |
Place lights at face height, slightly forward, for soft, even cross-illumination that erases under-eye darkness completely.
Optimal Height Placement
Getting rid of shadows is only half the battle if your lights are in the wrong spot. Mounting fixtures too high causes under-eye concealer to look patchy in daylight. The fix is simple: face-height illumination.
Here’s how to nail your lighting placement:
- Position fixtures at cheek level on both sides of your mirror. This eliminates overhead shadows that age you instantly.
- Keep lights between eye level and chin for even coverage across jawlines and temples.
- Use adjustable mounts so you’re never stuck with distorted shadows if you switch chairs.
Side lighting at proper height makes contouring almost effortless, and brightening accuracy becomes foolproof. You’ll eliminate guessing about whether your coverage actually matches.
Add Front-Facing Light for Even, Shadow-Free Blending

Why do harsh shadows keep ruining your blend, no matter how carefully you swirl that brush? This is worth fixing. The easiest way is adding front-facing light at eye level. It banishes those stubborn under-eye shadows and gives you even illumination across your whole face.
I use a ring light or two softbox lights positioned straight in front of me. This creates your shadow-free baseline for precise blending, and it’s simple to set up.
What to look for:
- Color temperature around 4000–5500K (like natural daylight, so your skin tones stay true)
- High CRI of 90+ (this renders makeup colors accurately, no weird shifts)
I pair mine with subtle side lights to catch any remaining shadows, keeping that front light dominant for flawless, even coverage every time.
Layer Three Light Sources Instead of Using Overhead Alone

Relying on that single overhead light in your bathroom can be problematic. I’ve left the house looking flawless only to discover scary shadows under my eyes in natural light. Layering three light sources, overhead plus two side lights at eye level, eliminates harsh shadows, mimics natural daylight, and enhances color accuracy so your foundation actually matches your skin.
Here’s how to set it up:
1) Position your two side lights about 45 degrees from your face, like a simple desk lamp on each side of your mirror.
2) Keep all three sources around 4000–5500K for consistent color rendering.
3) Move them 1–2 feet away for soft, even coverage that makes every blend look seamless.
Eliminate Harsh Shadows
When I first started doing my makeup in a bathroom with just one overhead fixture, I’d end up with these weird dark patches under my eyes and along my jaw that I’d somehow missed until I saw myself in natural light later. I’ve done this several times, and it’s not an ideal way to start your day. The solution is to stop relying on that single overhead bulb and instead layer three light sources around your mirror.
Here’s the easiest setup:
- Keep your overhead light, but add two LEDs at eye level, positioned at 45 degrees on each side of your mirror.
- Choose LEDs with a high CRI (Color Rendering Index) and adjustable brightness, keeping all three lights at similar levels.
This creates even, shadow-free illumination without washing out the details you need for precise blending.
Mimic Natural Daylight
Where exactly do you think you’re standing when you check your makeup in the car mirror? You’re outside, under open sky, and that’s the gold standard we’re chasing. I’ve layered three sources to fake that magic indoors. This approach is effective because it addresses the specific lighting challenges that prevent accurate makeup application.
| Light Position | Purpose | Settings |
|---|---|---|
| Overhead | Gentle top glow | Dimmed low, 4000–5500K |
| Side (45° both) | Kill under-eye shadows | Face level, medium brightness |
| Front ring/diffuser | Shadow-free coverage | Dominant, 0.5–1m away |
I match all three to daylight balance, around 5000K, so my foundation doesn’t turn orange later. High CRI bulbs matter here; cheap ones lie about color. I adjust brightness hierarchically: front light leads, others follow. This setup prevents color mismatches that occur when foundation tested indoors looks different in natural light, and it ensures your blush and other products appear as intended.
Enhance Color Accuracy
Layering three light sources instead of relying on that single, harsh overhead fixture makes all the difference between makeup that looks right at home and makeup that surprises you in a bathroom mirror halfway through dinner. I have unfortunately done this several times.
Here’s how we build this together, easier than you think:
- Overhead ambient softens the room so you don’t feel isolated in a spotlight
- Side vanity lights at eye level erase those unflattering under-eye shadows that trick you into over-correcting
- A diffused ring light wraps your face in welcoming, shadow-free light that feels like belonging in your own skin
This setup is worth the investment. Match your lights’ CRI at 90+ and keep color temperature near 4000–5500K. This mimics daylight so your blush and foundation stay true. Keep all three at similar distances, and your makeup will look consistent across different lighting environments.
Match Color Temperature to Your Most Common Destinations
Why does your foundation look flawless in the bathroom mirror, yet completely off once you step outside? This happens because the lighting isn’t matching your color temperature to where you actually spend time.
The fix is straightforward:
- Aim for 4000K–5500K bulbs. This mimics natural daylight and keeps your skin from looking yellow or orange.
- Avoid anything below 3000K (too warm) or above 6000K (too harsh and blue).
- Check your CRI and go for 90 or higher. High-CRI lighting shows true makeup shades, so what you see is what you get.
Match this temperature across your home, work, and vanity spaces. Consistency eliminates shade shifts when you walk out the door.
Install Dimmers to Adjust Your Makeup Lighting All Day
How often have you leaned into the mirror at 6 AM, only to squint under blinding brightness that feels like an interrogation room? This common problem is worth fixing.
Dimmers let you smoothly adjust brightness from dim to bright, reducing glare and eye strain during detailed steps. Pair dimming with adjustable color temperature to maintain consistent color perception across different times of day.
Why dimmers belong in your routine:
- No more harsh morning glare burning your retinas
- Softer evening light that feels gentle and comfortable
- Confidence you’re not over-applying heavy products
- Uniform lighting as you move closer to your mirror
- Control that makes your space truly yours
Calibrate to roughly 1500–3000 lumens for clarity without washing out colors. Installation is straightforward.